Thursday, July 12, 2018

Give Brussels sprouts the sweet-and-sour treatment

RECIPE:
Sweet, sour, lentils and all that jazz. Check out this this recipe.

During busy times, try these nutritious meals

Nutritious Meals for Busy School Nights


(Family Features) When school is back in session, the real test for parents is not in the classroom, but in the kitchen. Between breakfast, lunch and dinner - not to mention snacks - meal planning seems endless and daunting.

With convenient options like canned ingredients on-hand, parents can have the makings of a wholesome homemade meal right at their fingertips.

Canned foods not only help cut down on prep time in the kitchen, but also deliver nutritional benefits. In fact, kids and adults who use six or more canned foods per week are more likely to have diets higher in 17 essential nutrients, according to a study published in "Nutrients." Plus, cans provide year-round access to seasonal fruits and vegetables, and keep food fresh and flavorful without the need for preservatives and additives.

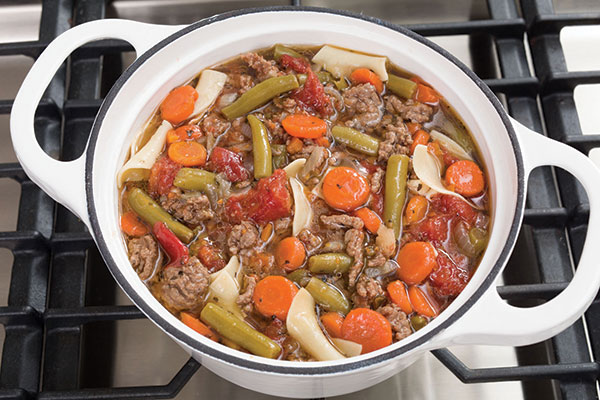
From on-the-go breakfasts like Vegetable Frittata Minis to hearty dinners like this Beef and Vegetable Soup and everything in-between, a well-stocked pantry - or your "cantry" - full of canned proteins, fruits, vegetables and soups can help busy parents get through the week with creative meals they can feel good about serving their families.

For more information about the nutritional benefits of cooking with canned foods and to find flavorful recipes for the back-to-school season, visit CansGetYouCooking.com.


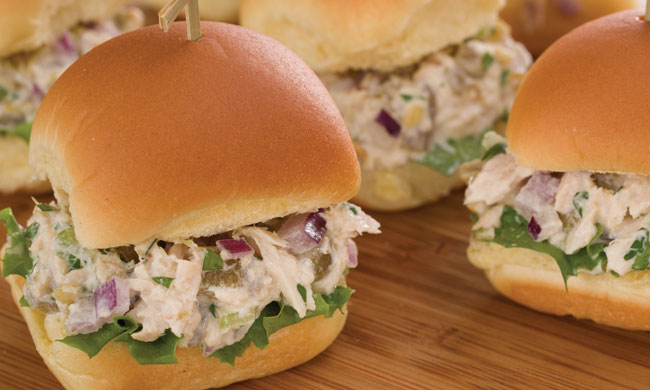
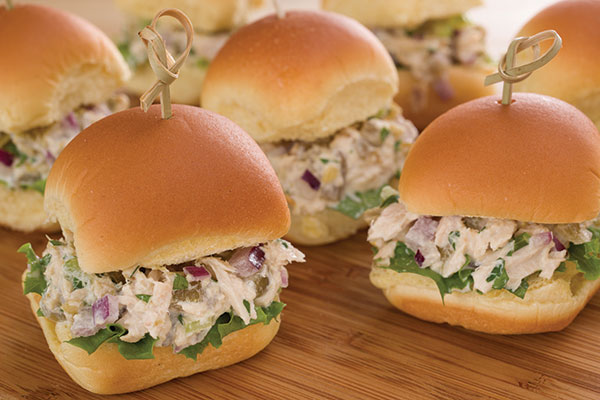
Tuna Sliders with Green Chilies


Recipe courtesy of Cans Get You Cooking

Servings: 12

  • 1 can (5-ounce) tuna, packed in water, drained and flaked
  • 1 can (4.25-ounce) chopped green chilies
  • 1/4 cup diced celery
  • 1/4 cup diced red onion
  • 1/4 cup reduced-fat mayonnaise
  • 2 tablespoons chopped fresh cilantro or parsley
  • 6 slider rolls, split
  • lettuce leaves

  1. In large bowl, combine tuna, green chilies, celery, red onion, mayonnaise and chopped cilantro; toss to mix well.
  2. Top bottom half of each roll with lettuce leaves; top with some tuna mixture and top half of roll.


Beef and Vegetable Soup


Recipe courtesy of Cans Get You Cooking

Servings: 6

  • 1 tablespoon vegetable oil
  • 1 pound lean ground beef
  • 1 medium onion, diced
  • 2 garlic cloves, minced
  • 1 can (14 1/2 ounces) low-sodium beef broth
  • 1 can (14 1/2 ounces) sliced carrots, drained
  • 1 can (14 1/2 ounces) cut green beans
  • 1 can (14 1/2 ounces) stewed tomatoes
  • 1 teaspoon dried basil
  • 1 cup cooked egg noodles

  1. In 4-quart saucepan over medium-high heat, in hot oil, cook ground beef until well browned on all sides, stirring frequently. With slotted spoon, remove beef to bowl.
  2. In drippings remaining in saucepan over medium heat, cook onion and garlic until tender-crisp.
  3. Add beef broth, carrots, green beans, stewed tomatoes, basil and ground beef; over high heat, heat to boiling. Reduce heat to low; cover and simmer 10-15 minutes to blend flavors, stirring occasionally. Stir in cooked egg noodles.


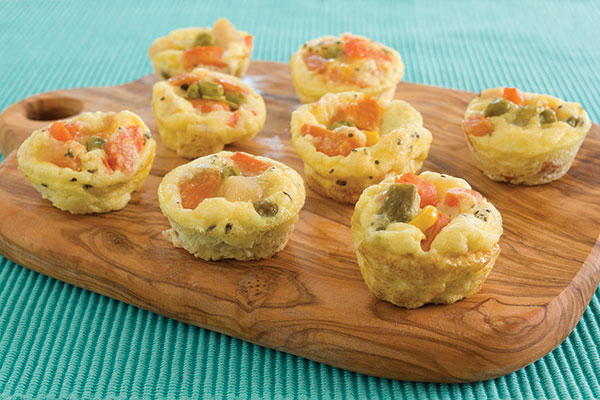
Vegetable Frittata Minis


Recipe courtesy of Cans Get You Cooking

Servings: 36

  • Nonstick cooking spray
  • 8 large eggs
  • 1/2 cup milk
  • 1/4 teaspoon salt
  • 1/4 teaspoon ground black pepper
  • 1/4 teaspoon dried basil
  • 1 can (8 ounces) mixed vegetables, drained
  • 1/4 cup grated Parmesan cheese

  1. Heat oven to 375 F. Spray mini muffin tins with nonstick cooking spray.
  2. In large bowl, beat eggs, milk, salt, pepper and basil to blend well. Stir in mixed vegetables and Parmesan cheese.
  3. Fill prepared pans with egg mixture. Bake until egg mixture puffs and is just set in center, about 8-10 minutes.
  4. With rubber spatula, loosen frittatas from muffin cups and slide onto platter.


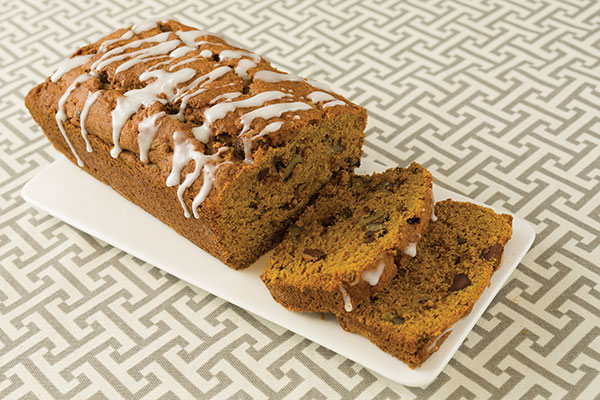
Gluten-Free Pumpkin and Chocolate Chip Bread


Recipe courtesy of Cans Get You Cooking

Servings: 20 (2 loaves)

  • 4 cups oat flour
  • 2 teaspoons baking soda
  • 2 teaspoons ground cinnamon
  • 1 teaspoon ground nutmeg
  • pinch of salt
  • 1 cup (2 sticks) butter, softened
  • 2 cups granulated sugar
  • 4 large eggs
  • 2 teaspoons vanilla extract
  • 1 can (15 ounces) pumpkin
  • 2 cups chopped walnuts
  • 1 cup bittersweet chocolate chips
  • 1/2 cup confectioners' sugar
  • 1 tablespoon milk

  1. Heat oven to 350 F. Grease two 8-by-4-inch loaf pans. In large bowl, combine oat flour, baking soda, cinnamon, nutmeg and salt.
  2. In large bowl using mixer, beat butter and sugar until light and fluffy. Beat in eggs one at a time. Add vanilla, oat flour mixture and pumpkin; beat until just blended. Stir in walnuts and chocolate chips. Spoon mixture into prepared pans.
  3. Bake 50-55 minutes, or until toothpick inserted in center comes out clean. Cool 10 minutes. Remove from pan. Cool completely.
  4. In small bowl, stir confectioners' sugar and milk until smooth. Drizzle mixture over pumpkin bread.

SOURCE:
Cans Get You Cooking

Tuesday, July 10, 2018

Try these school lunch ideas this summer and get a jump on a healthier school year

It's summertime, but the school year is right around the corner! Parents are all getting on board to offer their kids healthier choices for school lunches. Family Features offers simple, delicious meal ideas to try out this summer and prepare for the school year.


(Family Features) When school is in session, it's the perfect time to renew your family's healthy eating habits by getting in a groove of lunchbox packing.

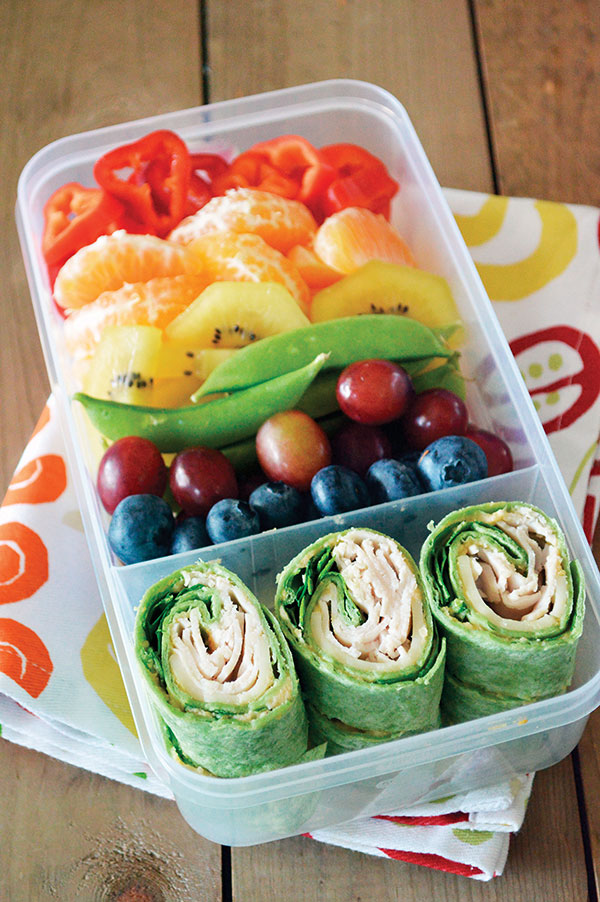
While packing a healthy school lunch day after day can seem daunting, it doesn't have to be. By taking the free Power Your Lunchbox Promise, you can gain access to customizable, make-ahead lunchbox inspiration like Black Bean Empanadas and Rainbow Bento Boxes, which creatively include servings of fruits and veggies to keep kids' brains charged all day.

Making the promise not only signals a commitment to making healthier meal choices this year, it also helps those in need. For every promise made, health-focused partner brands will collectively donate $1 to Feeding America programs that support families and children. In addition to kid- and registered dietitian-approved breakfast, lunch, snack and dinner recipes, the promise website features coupons, health tips to help your family during the school year, lunchbox ideas and giveaways.

Additionally, teachers have a special section of the site where they can make the promise as a classroom and download free fruit and veggie themed classroom decor and lesson plans.

To find your lunchbox inspiration and make the promise, visit poweryourlunchbox.com.


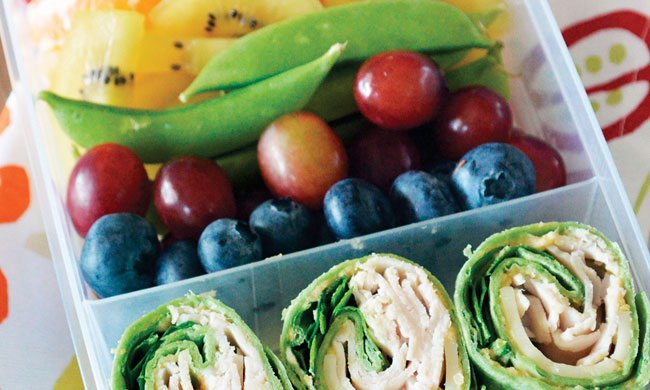
Rainbow Bento Box


Recipe courtesy of Produce for Kids

Prep time: 15 minutes

Servings: 2

  • 2 red mini sweet peppers, sliced
  • 1 mandarin, peeled and segmented
  • 1 kiwi, sliced
  • 1/2 cup sugar snap peas
  • 1/4 cup blueberries
  • 1/2 cup red seedless grapes
  • 1 large spinach wrap
  • 1 tablespoon hummus
  • 2 slices provolone cheese
  • 2 ounces low-sodium deli-sliced turkey
  • 1/2 cup baby spinach, chopped

  1. Assemble two lunchboxes each with half of the peppers, mandarin, kiwi, snap peas, blueberries and grapes.
  2. Lay wrap on flat surface. Spread with hummus and top with cheese, turkey and spinach. Roll up tightly and slice into 1-inch thick rounds. Add half to each lunchbox.


Black Bean Empanadas


Recipe courtesy of Produce for Kids

Prep time: 10 minutes

Cook time: 25 minutes

Servings 6

  • 1/2 teaspoon olive oil
  • 3 mini sweet peppers, finely chopped
  • 1/4 cup finely chopped sweet onions
  • 1/2 cup chopped tomatoes
  • 1 cup no-salt-added black beans, drained and rinsed
  • 1 tablespoon low-sodium taco seasoning
  • 12 frozen empanada discs, thawed
  • 3/4 cup shredded low-fat cheddar cheese
  • 1 large egg white, beaten
  • 6 guacamole minis
  • 6 packages crispy fruit

  1. In skillet over medium heat, heat oil. Add peppers, onions and tomatoes. Cook 3-4 minutes, or until tender. Add black beans and taco seasoning. Cook 2 minutes. Set aside to cool.
  2. Heat oven to 375 F.
  3. Lay empanada dough out on parchment-lined baking sheet. Fill with black bean filling and 1 tablespoon cheese. Fold dough over filling to create pocket. Use fork to press down sides to seal. Brush with egg whites. Repeat with remaining dough, filling, cheese and egg whites.
  4. Bake 20-25 minutes, or until golden brown. Remove from oven and let cool.
  5. Serve two empanadas with guacamole, for dipping, and crispy fruit on side.

SOURCE:
Produce for Kids

Monday, December 22, 2014

HAP offers healthy family recipes from eKitchen

Your kids will love waking up to these adorable treats on Christmas day. 

Santa Hat Brownies Recipe

Here’s a healthy holiday treat that will bring a smile to your face. Delicious low fat brownies topped with healthy strawberries and whipped topping make easy Santa Hat Brownies that everyone will love.

Santa Hat Brownies

Ingredients

    • 1/2 cup all-purpose flour
    • 1/2 cup whole wheat flour
    • 1 tsp baking powder
    • 1/8 tsp salt
    • 1/2 cup unsweetened cocoa powder
    • 1/4 cup dark chocolate chips
    • 1 large egg
    • 1 large egg white
    • 1 tsp vanilla extract
    • 1 cup low fat vanilla yogurt
    • 1/4 cup dark brown sugar
    • 3/4 cup granulated sugar
    • 1 Tbsp canola oil
    • 1/2 cup light whipped topping
    • 32 strawberries

Preparation

    • 1. Preheat oven to 350°. Lightly coat 2 mini-muffin pans with nonstick cooking spray.
    • 2. In a small bowl, combine flours, baking powder, salt, cocoa and chocolate chips.
    • 3. In a large bowl, combine remaining ingredients except the whipped topping and the strawberries, and stir until well blended. Add the flour mixture and stir until just blended. Pour batter into muffin pans and bake for 15 minutes, or until a toothpick inserted in the center of a brownie comes out clean. Cool completely on a wire rack.
    • 4. On a cutting board, with a sharp knife, cut the stem sides of the strawberries so they are flat.
    • 5. Remove brownies from muffin pans and arrange them on a flat surface. With a spoon, spread a rim of whipped topping around the top of each brownie. On each brownie, place a strawberry, flat side down, on top of whipped topping. Drop a small dollop of whipped topping on the pointy tip of each strawberry.
Yield: 32 servings
Nut Allergy: If you have an allergy to nuts or nut products, read the packaging, labels, warnings and directions for all ingredients in this recipe to determine whether the non-nut ingredients in this recipe were manufactured in a plant that processes nut products. We recommend that you do not solely rely on our information. For additional information about a product, please contact the manufacturer.

Nutrition Facts

Serving Size: 1 brownie
    • Calories: 69
    • Fat: 2g
    • Saturated Fat: 0
    • Cholesterol: 6mg
    • Sodium: 16mg
    • Carbohydrates: 11g
    • Fiber: 0
    • Protein: 2g
* Nutritional information is based on ingredients listed and serving size; any additions or substitutions to ingredients may alter the recipe's nutritional content

Chocolate Banana Pops Recipe

These cool treats bring together that terrific chocolate and banana combo. If you like peanut butter and banana too, sprinkle some chopped dry-roasted peanuts on the chocolate before you chill them.
Chocolate Banana Pops

Ingredients

    • 4 large bananas
    • 8 popsicle sticks
    • 4 oz dark chocolate chips
    • 1 Tbsp canola oil

Preparation

    • 1. Line a baking sheet with waxed paper.
    • 2. Peel and cut the bananas in half crosswise to make 8 pieces. Push a popsicle stick into each banana half.
    • 3. In a microwave-safe bowl, combine chocolate and oil. Microwave on high for 20 seconds, stir, and continue to microwave at 10-second intervals until melted.
    • 4. Pour melted chocolate into a tall glass. Dip bananas in chocolate mixture, spooning on additional chocolate to cover, and set on prepared baking sheet. Refrigerate for 2 hours or until chocolate is firm.
Yield: 8 servings
Nut Allergy: If you have an allergy to nuts or nut products, read the packaging, labels, warnings and directions for all ingredients in this recipe to determine whether the non-nut ingredients in this recipe were manufactured in a plant that processes nut products. We recommend that you do not solely rely on our information. For additional information about a product, please contact the manufacturer.

Nutrition Facts

    • Calories: 142
    • Fat: 6g
    • Saturated Fat: 3g
    • Cholesterol: 0
    • Sodium: 1mg
    • Carbohydrates: 25g
    • Fiber: 9g
    • Protein: 1g
* Nutritional information is based on ingredients listed and serving size; any additions or substitutions to ingredients may alter the recipe's nutritional content

*Recipes reposted with permission from HAP’s Cook eKitchen. For a full line of healthy recipes from breakfast, lunch, soups, dinner and snacks - visit http://hap.webhealthyrecipes.com/Cook-eKitchen-CEK

Saturday, November 22, 2014

Strawberries and Cream filled Coconut Cake with Chocolate Ganache

I'm always experimenting with dessert recipes. Changing or adding this or that. Most times they turn out great, while other times not so good. But this time I think I have a winner. This is a very moist and somewhat dense cake, made with fresh juicy Driscoll's strawberries all folded up into rich layers of a sweet, cream cheese and white chocolate filling. Top it off with a creamy chocolate ganache and your holiday meal is complete.
I've also made this cake using fresh Driscoll's raspberries, which is the perfect ending for your family Thanksgiving or Christmas holiday meal. 
Now let's get started. 
Strawberries and Cream filled Coconut Cake with Chocolate Ganache

Ingredients
Cake
1 box white cake mix
1 tsp baking powder
4 eggs (use just the egg whites of 2 or all 4 eggs for a less dense cake)
3/4 of one can of coconut milk, mixed well
2 tsp McCormick's very vanilla extract
2 tsp coconut extract


Filling
8 oz cream cheese-room temperature
4 oz white chocolate-melted
1/2 cup heavy cream
1 tsp McCormick's very vanilla extract
2 tsp coconut extract
1 1/2 cups powdered sugar
2 cups fresh Driscoll strawberries, chopped
Fresh strawberries with special thanks to Driscoll's
1 cup fresh Driscoll strawberries, sliced for decorating
2/3 cup shredded coconut

Ganache
1 1/2 cup semi-sweet chocolate chips-melted
1 cup heavy cream

Frosting
1 12 oz tub Cool Whip, thawed

Directions
Cake
Preheat oven to 350 degrees. Prepare three 9" cake pans with cooking spray and flour and set aside.
Empty cake mix in large mixing bowl. Add baking powder and stir together. Open and stir coconut milk until smooth. Pour 3/4 of the can into cake mix and blend at medium speed with mixer for about 3 minutes or until smooth and completely mixed. Add eggs one at a time, mixing well after each egg. Mix in vanilla and coconut extracts.
Pour equal parts into each of the three 9" cake pans. Bake at 350 degrees for 35 minutes or until golden brown and top springs back when touched.
Set cake pans on wire racks to cool. Remove one cake layer from pan and place flat side down on cake plate. Using a knife, trim cake layer of any mound so that layer is flat on top. Remove remaining two cake layers from pans and level as well. (Be sure to eat the trimmings!)
Prepare strawberries
Clean and chop enough fresh Driscoll's strawberries to make 2 cups. Clean and slice a separate cup of fresh Driscoll strawberries to decorate top of cake. Set aside.
Prepare ganache
Pour one and a half cups of semi-sweet or milk chocolate chips into microwavable bowl. Add 1 cup of heavy whipping cream. Microwave for one minute and stir until smooth. Set aside and let cool to room temperature.
Prepare filling
Break up white chocolate into small pieces in microwavable bowl. Microwave at 30 second intervals until all chocolate is melted and smooth. Set aside, stirring periodically until cooled.
Blend cream cheese and extracts on med-high speed until fluffy. Pour in melted white chocolate and mix. Slowly add heavy cream and powdered sugar mixing at med-high speed. Continue to mix until filling thickens. Stir in chopped strawberries and optional 2/3 cup shredded coconut with large spoon or spatula. Place in refrigerator for about 15 minutes.
Remove from refrigerator and pour about half of filling onto center of prepared cake layer, spreading to half inch from edges. Place second cake layer, flat side down on filling and top with remaining filling. Place the last cake layer, flat side down on top. Frost entire cake with Cool Whip and refrigerate for 15 minutes.
Remove from refrigerator and pour ganache on top of cake directly in center, allowing to flow down sides. Decorate with fresh sliced strawberries and refrigerate at least one hour before serving.
Enjoy!

Visit Driscolls.com where you'll find recipes for pies, cakes and many other desserts to serve all your holiday needs.
Thanks to Driscoll's for suppling the farm fresh strawberries.
Tuesday, October 28, 2014

Halloween: Ghoulish Black Bean Chili Casserole

I found this recipe at www.pillsbury.com and it's fantastic! Couple little things I did differently. I added the one cup of shredded Cheddar cheese, but I also added an additional cup of Kraft Mexican blend cheese. I also served it with a dollop of sour cream on top. Turned out great. It's a very quick and easy meal to get you and your little goblins out the door this Halloween.
This heats up well for leftovers too!
Thanks Pillsbury......
Photo from Pillsbury.com

Ingredients

1
lb. chorizo or Italian sausage, casing removed if necessary
1
medium green bell pepper, seeded, chopped
1
cup chopped onions
1
cup uncooked regular long-grain white rice
1
cup Green Giant™ Niblets® Frozen Corn
1
(15-oz.) can Green Giant™, Joan of Arc®, Old El Paso™ or Progresso™ Black Beans, drained, rinsed
1
(14 1/2-oz.) can ready-to-serve chicken broth
1
(14.5-oz.) can Mexican stewed tomatoes with jalapeños and spices, undrained, cut up
1/2
cup water
2
teaspoons chili powder
1/2
teaspoon cumin
4
oz. (1 cup) shredded Cheddar cheese

Directions

  • 1. Heat oven to 375°F. Crumble sausage into 12-inch nonstick skillet. Add bell pepper and onions; cook over medium-high heat until sausage is browned, stirring occasionally. Drain.
  • 2. Stir in all remaining ingredients except cheese. Spoon into ungreased 13x9-inch (3-quart) baking dish. Cover tightly with foil.
  • 3. Bake at 375°F. for 1 to 1 1/4 hours or until rice is tender. Remove from oven; sprinkle with cheese. Return to oven; bake an additional 5 minutes or until cheese is melted.

    Nutrition Information

    NUTRITION INFORMATION PER SERVING

    Serving Size: 1/8 of Recipe
     
    Calories
    420
     ( 
    Calories from Fat
    200),
     
    % Daily Value
     
    Total Fat
    22g
    22%
     
    (Saturated Fat
    9g,
    9%
     ), 
    Cholesterol
    50mg
    50%;
     
    Sodium
    1000mg
    1000%;
     
    Total Carbohydrate
    36g
    36%
     
    (Dietary Fiber
    4g
    4%
     
      Sugars
    4g
    4%
     ), 
    Protein
    20g
    20%
     ; 
    % Daily Value*:
     
    Vitamin A
    15%;
     
    Vitamin C
    20%;
     
    Calcium
    15%;
    Iron
    15%;


  • Friday, October 24, 2014

    Featured Recipe: Chocolate Cream Extreme Bundt Cake

    This cake screams delicious. The paring of a chocolate pudding cake with a cream cheese and whipped cream blend filling, all topped with a milk chocolate icing makes this the perfect Bundt cake for the upcoming holidays.


    A slice of Heaven
    Ingredients (Cake)
    1 box Pillsbury chocolate cake mix (with pudding in the mix)
    1 small box Jello brand chocolate instant pie filling
    1 can Pillsbury milk chocolate frosting
    2 Tbl water
     Filling
    1 1/4 cup powdered sugar
    1 tsp vanilla
    1 8 ounce Philadelphia cream cheese
    1 8 ounce Kraft Cool Whip


    Directions
    Prepare cake according to directions. Mix in package of chocolate instant pudding and mix well. Batter will be stiff, add 2 tablespoons of water and finish mixing.
    Pour batter into prepared bundt pan and bake according to directions.
    While cake is baking prepare filling.
    Beat cream cheese with powdered sugar and vanilla with mixer until smooth and fluffy. Fold in Cool whip until well blended. Set aside.
    When cake is done, remove from oven and place on wire rack. Take a knife and run it along the outside of the cake to prevent sticking.
    Invert cake onto a plate and cool completely.
    Using a sharp knife, slice cake evenly from side to side. Gently separate the top half of the cake from the bottom half and set aside.
    Spread filling evenly on bottom half of cake and gently replace top half.
    Completely frost entire cake with milk chocolate frosting.
    Now enjoy!

    Thursday, June 19, 2014

    Driscoll's Strawberry Shortcake Skillet Cobbler

    Dorie Greenspa
    Photo by Vicki Arsenault/Recipe and berries courtesy of Driscoll's.
    n has a story to tell.
    It’s a "berry" sweet story of strawberry shortcake. The ‘culinary guru’ and award winning cookbook author, together with Driscoll’s offers everything you ever wanted to know about shortcake but were afraid to bake!
    For over 100 years, Driscoll’s farm fresh strawberries have been a part of some variety of a shortcake recipe. Greenspan, who says she adores baking for the love of creating and the joy of sharing, serves up shortcake in a variety of desserts.
    Cookbook author Dorie Greenspan
    Photo courtesy of Driscoll
    One recipe that really caught my eye was the Strawberry Shortcake Skillet Cobbler. I’ve had many varieties of shortcake, but never one that incorporated corn meal into the batter. My interest was peaked, and what better day to give it a try than National Strawberry Shortcake Day!
    I was won over with this recipe. I made a slight change by adding two pints of Driscoll’s fresh red raspberries (my love of raspberries!) and the next time I may even add a pint of fresh blueberries.
    This is a wonderful summer time recipe. It’s not too sweet and the corn meal shortcake goes well with the juiciness of the berries. Top it off with a dollop of sweet whipped cream and you’ll be back for seconds.


    INGREDIENTS
    Cobbler
    ·       2 packages (16 ounces each) Driscoll's Strawberries, hulled and sliced
    ·       3/4 cup granulated sugar, divided
    ·       2 tablespoons freshly squeezed lemon juice
    ·       1 tablespoon cornstarch
    ·       1 cup all-purpose flour
    ·       1 cup cornmeal
    ·       2 tablespoons baking powder
    ·       6 tablespoons cold unsalted butter, cut into pieces
    Photo by Vicki Arsenault
    ·       Pinch salt
    ·       1 large egg
    ·       1/2 cup milk
    Whipped Cream
    ·       1 cup heavy whipping cream
    ·       1 tablespoon confectioners' sugar
    DIRECTIONS
    1.Combine strawberries, 1/4 cup granulated sugar, lemon juice and cornstarch in a medium bowl. Let sit 15 minutes.
    Preheat oven to 375°F. Butter a 10-inch cast-iron skillet.
    Whisk together flour, cornmeal, remaining 1/2 cup granulated sugar and baking powder in a large bowl. Add butter and salt and cut into flour mixture with a pastry cutter or your fingers until the butter is incorporated. Whisk egg and milk together in a small bowl. Stir egg mixture into flour mixture.

    Scrape strawberries and juices into prepared skillet. Drop batter by the spoonful on top of strawberries.
    Bake 30 to 35 minutes, or until the shortcake cobbler is golden brown. Remove pan from oven and let cool at least 15 minutes before serving.
    Use a hand mixer to beat cream and confectioners' sugar until thickened. Spoon cobbler into serving dishes and top with sweetened whipped cream. 
    For more Strawberry Shortcake recipes, click here!